Geo Thermal SAHP

Update 6/20/2021: The two GSH-015’s were taken out due to issues. I replaced them with a single Climate master R410a horizontal unit. The new unit was only very slightly larger than one of the old units in length only, giving me a nearly a 50% reduction in used space. I had to do duct re-work combining the left and right feeds into one, etc.. but it was well worth it. The performance of the unit has been great, exceeding the submittal sheet data at times, something that the old pumps NEVER even got close achieving. In heating mode I have output temps over 100 degF all the time, and when I boost the entering water temp with solar (85 degF feed to heat pump), it goes as high as 117 degF., output air temp.. The over electrical load is about the same at any one given moment. Run times seem to be less, indicating much better efficiency, though I am still collecting data. Using the Climate Master brand thermostat that is designed for this unit specifically, provides me with much more information and functionality as well.
A picture of the new unit is above.
12/03/2008 Update. The two GSH015's are now active in base line mode. The only solar assist is the trench solar flat plates doing direct ground heating. Today we finally had a sunny day, 12/03/2008 Wed... the first one in weeks and the first one since they went active. I am still tweaking them of course, trying to get the right blower speeds. I added infinite blower speed control to each heat pump so I can regulate the air flows better. My duct work is very efficient so I had to cut the blower speeds so the LAT's were high enough and it didn't sound like you were in a wind tunnel when they kicked on. The house re-insulation is still not finished so the down stairs return air is only 62 degrees or so, making it harder to get desirable LAT's. This in the long run will resolve itself when I boost the EWT's with solar directly and the downstairs insulation envelope is done boosting EAT's as well... LAT's in the 100-110 DegF range should then be the norm... which is where you want them to be.
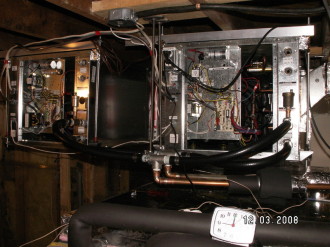
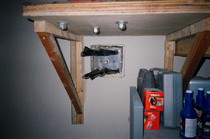
GSH015's hanging from the ceiling. The clock in the foreground shows how long they run each day. The end covers are off showing the control boards. The de-superheater lines are not connected yet. That will be done when they are in direct solar assisted mode.
Closeup of the control board end. If you look carefully, at the top under the right lower corner of the silver capacitor, you can see the dial knob for the blower motor speed control I added. It is rated at 6 amps, 240VAC, ebay $20... These two units had the standard CXM boards in them which do not allow for daisy chaining off one thermostat. I upgraded the transformer in 1 unit from 50va to 100va. I then disconnected the transformer in the second unit and ran its control board off the transformer in the first unit. T-stat connections were jumpered across from unit one to unit two, wire for wire. The whole thing cost only $100 as opposed to upgrading to DXM boards in both units, a bit more expensive.
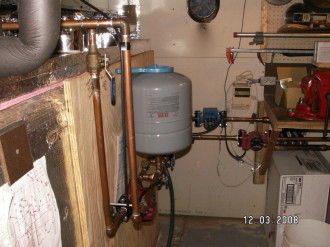
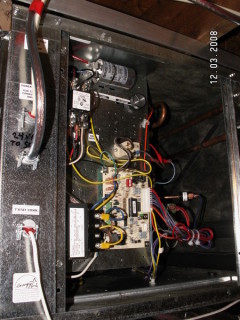
Photos showing loop plumbing, 3 circulators, expansion tank, fill valves, check valves, ground loop manifolds and "to be" flow gauge". I estimate flow to be 10GPM for both pumps together. You can see the GL-30 solar diff. controller in the background for the flat plate trench array. At the top center, you can see the old chimney connection for the Bock 32 gallon oil fired water heater. The one heat pump is hanging where the old Rheem air handler used to be.
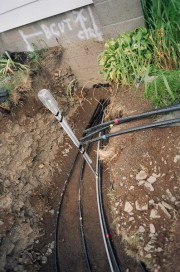
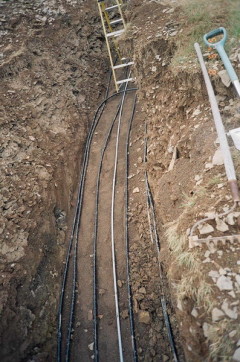
Four 3/4" Geothermal pipe 500' loops go through wall in basement. Trench is 250' long so the fluid travels out on the top 4 and loops around and comes back in the bottom 4 with NO SEAMS in the ground. Grey pipes sticking up are for differential controller sensors quick access.
Other side of basement wall where the eight "ends" enter. Center grey pipe is for the sensor cable (cat3).
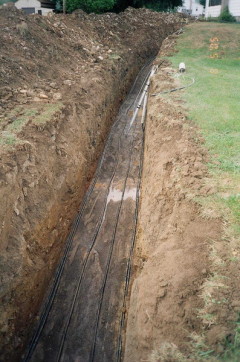
Bottom 4 Geothermal pipes averaging 6' to 6'-4" down in a 42" width trench. You can see next to the outer two Geothermal pipes, the solar ground loop "snuggled" up against them. The solar ground loop pipes and the sensor lines for that differential controller are visable in the white pipes. The 6' layer is backfilled 2-1/2' then the top layer is layed and backfilled the remaining 42" to be flush with the ground.
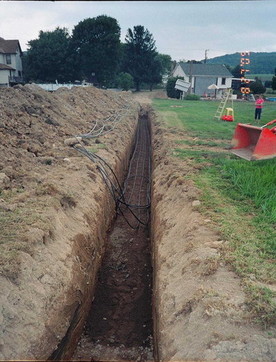
Bottom layer is now being covered up and the top layer pipes and grey 115VAC feed pipe for the outdoor circulating pump are shown curving back.
Solar ground loop is shown approaching the house where it curves 180 Degs back down the other side of the trench. Grey sensor cable shown in the middle.
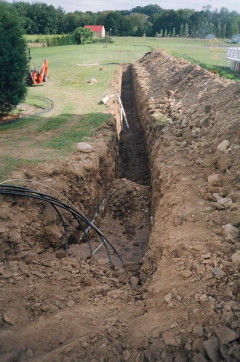
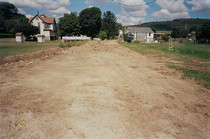
Last 125' of trench has been dug. Bottom has been smoothed out and first layer of sand put down. Remaining bottom layer of pipe has been layed and awaiting sand then backfill to 42" below top of ground. You can see the solar loop folded back on itself do to its extra length at this end of the trench.
Construction was temporally halted while a quick inspection of the sand layer was accomplished by supervisory personnel.

Bottom layer has been backfilled with dirt. Next is to smooth it out with a rake and shovel for first layer of sand and then put down the remaining layer of tubing,
final layer of sand then completely backfill to ground level. Should be completed by the end of the Labor day weekend 2005.
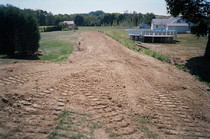
Final layer of sand being put on upper pipe layer. This is the driest year I have seen since 1999!! For this job, I got lucky!!
Back filling complete. Next is the bulldozer to smooth it off before Winter.
Bulldozer levels off for Winter. Springtime final filling and smoothing before seeding.
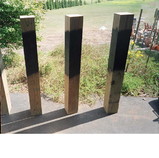
6" x 6" PT wood timbers sprayed with rubberized undercoating above and below the to be ground line. These will support the 3 - 4' x 8' flat plate collectors with the addition of some concrete and aluminum angle iron racking.
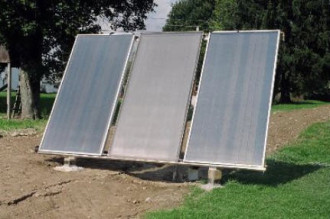
10/20/2005, array active. Just some insulation and sensor wiring to finish. You can see with the large sudden rainfall in October, the trench all at once has sunk about 10". This is actually good so in the Spring the ground can be leveled and seeded with grass.

Side shot shows both the tracking evacuated tube array and the new SAHP ground loop array.
Last Updated 6/27/2026
2024 is another PV Record Buster !!
Its official! 2024 is also a PV production record buster. The main tracking array produced 18.503 MWH's. However, the gorund test array added another 4517 KWH's to that, totaling 22.847MWH's, an increase over last year of .173 MWH's total.
UPDATE 6/23: Kia Nero traded in for Kia EV6.
UPDATE 9/22: New 40+ KWH battery backup installed with coming 4.6KW direct feed array. See details under 'My Solar Home', Solar PV.
********************************************
BLOG site for "open" topic writings, by myself!
https://nosidestaken.blogspot.com/2025/01/a-republic-if-you-can-keep-it.html
https://nosidestaken.blogspot.com
********************************************
Where to Find Us:
www.WeAreSolar.com (Fitch Consulting)
1072 Fowlersville Rd
Berwick, PA 18603
Phone: 570-752-4827
Update 6/2026: Peak solar production for my house in one day is about 142.7KWH.
What's New
01/12/2021 My new GEO heat pump is finally installed. I have been "tweeking" it until today, 01/16/2021. It works GREAT!! Unlike it predecessor's, it actually performs up to its submittal sheet. LOVE IT!!

I finally finished my electric overhead to underground conversion along with the transformer upgrade (15KW to 50KW).
May Monthly Production Record Gets blown away in June at 2517KWH !!
Made changes to my PV tracking system. The main PV inverter was upgraded from an SMA SB-US-8000 to a Fronius Primo 11.4 (11,400 watts). Additionally, the PV arrays were upgraded with 20 SunPower 327 watt modules leaving 16 of the original Canadian Solar 255 watt modules, bringing the total output of the array from 9.18KW to 10.620KW. The combination of the inverter upgrade coupled with the array KW upgrade, should generate an additional 2 to 3 MWH a year. I hope this will compensate for the increased cloudiness being produced by Green House Gas Heating Climate change. It took a fair amount of work to do all this....
UPDATE: All 36 modules are being changed out which will result in an array output of 11,772 KW. On a very sunny year, 20 MWH should be within reach.
PV Yearly Production Numbers
2022-2024. Yearly numbers are running around 22 to 23MWH's a year with ground test array added.
2021 PV Production is 19.325 MWH which just misses the record breaker last year. Across the year, 2021 was much cloudier but crazy super sunny March made it almost even. Since the system has been running, we have produced over 129 MWH's total.
2020 PV Production is 19.375 MWH which is a new record buster.!! The only month that did not gen more than last year was October. Our usage was up due to more driving and general increases, which the increase in production was able to satisfy. That production defers about $2000.00 worth of power from the grid.
2019 PV Production is 16.787 MWH.
2018 PV Production is 12.463 MWH.
2017 PV production is 14.293 MWH.
2016 PV production is 15.629 MWH.
2015 PV production is 14.543 MWH.
2014 PV production is 7.711 MWH, first year partial production. 9.374 MWH were produced through the entire startup test phase of the system before certification.
2019 production was a record breaker, do to the upgrade being active for 1/2 the year along with being decently sunny. Most likely, if the array upgrade had been active for the whole year, 17 or 18 MWH's would have easily been had.
2018 production was the worst production ever, not only for PV but for all solar. The rain and cloud cover was unpresidented! WE blew right through the 13 Megawatt range and landed in the low 12's. An increase in array capacity might be necessary to adapt to the GH GH'ing realities causing climate change, to resore a slight electrical surplus.
2017 production down 1.34 MWH from last year. All months produced less except for December which is the cloudiest month of the year.... Ironic...
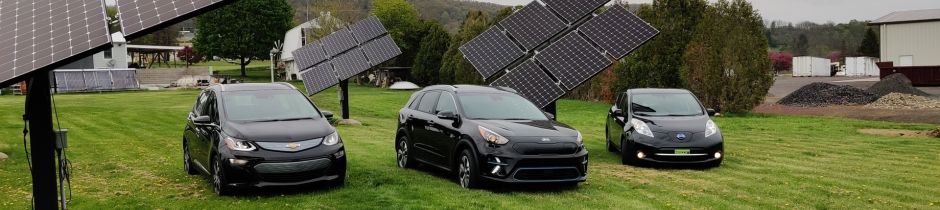
Electric car miles for the fifth year are 15863 saving 690 gallons of gas at an avoided cost of $1932, bringing the five year total to $9172.00. Covid-19 reduced mileage, but a third car (Bolt) and a third driver beginning in August, over turned the shortfall.
Electric car miles for the forth year are 14037 saving 610 gallons of gas at an avoided cost of $2014.00 bringing the four year total to $7239.00. Gas went up and down over the period.
Electric car miles for the third year are 13,220 saving 575 gallons of gas at an avoided cost of $1955.00 bringing the three year total to $5225.00. Gas prices steadily climbed throughout the year. Total number of gallons not used stands at 1790.
Electric car miles for the second year are 14,830 saving 645 gallons of gas at an avoided cost of $1870.00 bringing the two year total to $3270.00. Not bad for only 2 years at fairly low gas prices...
Electric car miles for the first year ran about 13,000 miles of energy free driving. The gas saved which would have been burned by the car that the Leaf replaced equals about 570 gallons at an avoided gas cost of $1400.00.
Total mileage across the three years equals 41,050 miles. At a gross electric usage of 3 miles per KWH year round, this translates to 13.68 Megawatt hours of electricity, or 4.56 Megawatt hours per year. With the addition of the Ford C-Max plug-in Hybrid over the last year, the total transportation electric load is increased by about 2 megawatt hours more, bringing the household trans electric yearly load to about 6.6 megawatt hours.